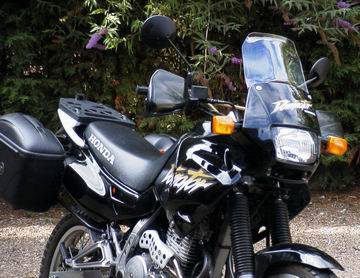
I recently tried to find a supplier local to the UK for a screen for my nx650 but to no avail, indeed the only company I could find that makes such a thing is in New Zealand and wanted to charge me no less than $140.00 for what was essentially a moulded piece of perspex.
So I decided to make my own and here is the result, not bad eh? and the total cost was Ł10.47 for the perspex courtesy of our DIY giants B&Q.
2, Draw out the shape of your screen, mine was 30cm wide x 28cm tall with a 2cm incline from the bottom corners up to the top, so the top of the screen then measures 26cm or so while the bottom is still 30cm.
3, Using a sharp Stanley knife and a metal straight edge carefully score your lines and snap the perspex away from the score, the edge of a table is good or better is a vice, use cloth in the vice to protect the surface. I found it easier to remove the plastic films beforehand even though this meant inevitable scratching would occur, it never looks that bad you know.
4, Then cut smaller pieces off the top corners to create that curved look and sand the whole thing down along all its edges until the shape is complete, use ever decreasing grades of paper until down to very fine for that smooth finish.
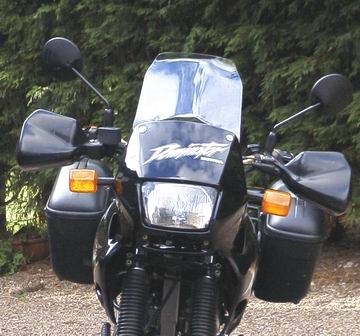
5, Now this is the tricky bit and as with cutting I highly recommend that you practice first at the moulding part.
6, Get yourself a camping gas stove and light it with the burner on about half strength, now put on some thick gloves, preferably fire retardant and have a bucket of water standing by, just in case. Now holding the screen along its length, that is the 28cm sides one in each hand, gradually run the perspex back and forth about 5cm above the flame for about 20 seconds then you will notice that it starts to bend away from the heat without any effort on your part.
Take advantage of that and apply even pressure with your thumbs and "help" it to bend further, be sure to remove it from the flames at this point, you have now created a basic screen shape, let it cool once you are happy with the curve. The perfect curve will reflect the curve prescribed by the shape of the inner side of your cowling as that is where the screen will be fitted.
OK now the all important top lip which helps to kick that wind up and over your head. Heat up the top edge of the screen in an area some 5cm wide from the top and all along the top edge until it is pliable then, and here's the trick, place the top edge onto a flat surface at an angle of about 45 degrees and press, as it bends the whole of the top of the screen press more until the top has that magical lip to it, presto not too bad eh? Let it all cool, notice also that it becomes slightly stronger after it has been heated and cooled but beware because it is more brittle than before.
Now to get the shape that will perfectly fit behind the cowling you need to heat up the whole of the bottom edge along its full width up to a height of about 10cm then, when pliable, place the screen behind the cowling and firmly press it into place, you will see the screen take up the shape of the cowling. Finally while it is still hot gently push the inside of the screen, the bit you would look through if you had your head down, forward to make the screen slightly more upright, it is tricky but well worth the effort.
7, Drill two holes of about 5mm through the cowling as pictured and secure the screen to the inside as follows.. from the front working back, bolt, steel washer, cowling, rubber washer, screen, rubber washer, steel washer, nut. Remember not to over tighten the nuts and you should get years of good use out of it.
 Back to the OzDOM Home Page